
Noteable with nbgrader for teachers
This guide provides key usage information for nbgrader with Noteable.
The core nbgrader documentation is a good source of material on working with assignments
Note that Nbgrader's documentation assumes everyone is running on the same computer, and using Jupyterhub to manage access, which differs from Noteable: Noteable provides multi-marker - see Multiple markers in Formgrader below.
Quickstart
Formgrader interface
The Formgrader menu is the instructor's hub for all assignment related activity on Noteable.
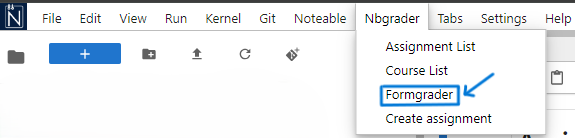
When logged into Noteable as an instructor, click on the Nbgrader tab and click on the Formgrader menu:
On the left hand side of the screen you will notice 3 tabs:
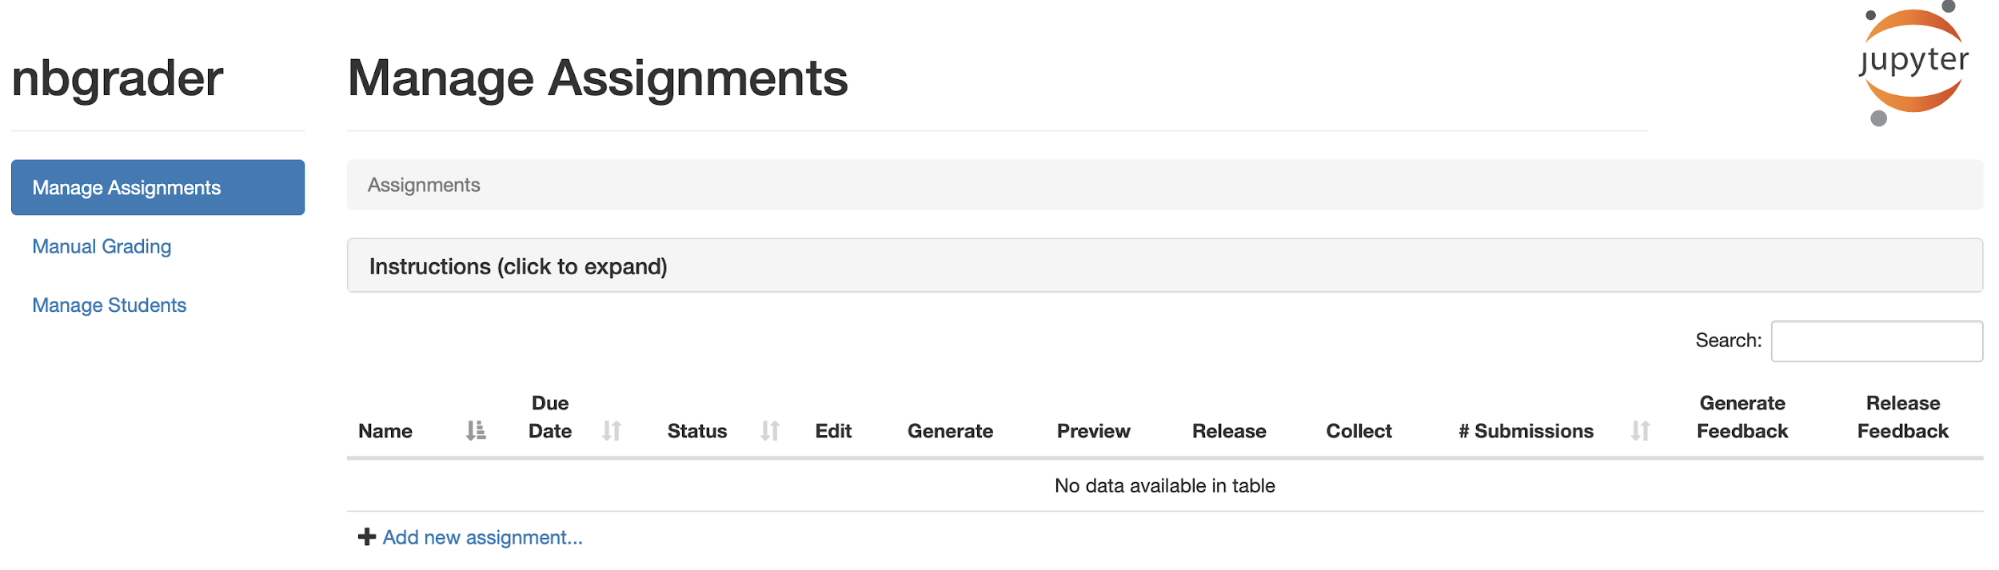
- Manage Assignments - The main Formgrader menu, showing assignment status and providing access to assignment tools.
- Manual Grading - Used to manage manual marking and feedback.
- Manage Students - Display information about students and allows the instructor to add additional information.
In brief, the core functionality of the main Formgrader menu is as follows:
- Name - Displays the name of assignment folders, and links to instructor versions of assignments ("source" folder).
- Due Date - Displays the due date for assignments.
- Status - Display the status of assignments (e.g.: "draft", "released").
- Edit - Allows the instructor to edit metadata for an assignment by clicking the pencil icon.
- Generate - Generates the student version of an assignment, stored in the release folder. Special syntax (see below) will be removed in this version.
- Preview - Links to student version of an assignment.
- Release - Makes the student version of an assignment available to students - students can then fetch, complete and submit assignment from Noteable.
- Collect - Loads all student submissions for an assignment.
- # Submissions - Displays the number of collected student submissions to date.
- Generate Feedback - Once marking is complete, clicking the cap icon generates feedback files for students.
- Release Feedback - Makes feedback files for an assignment available to students.
Multiple markers in Formgrader
Multiple instructors on the same course can access Formgrader for assignment-related activities in Noteable. Autograding in the UI automatically grades all submitted assignments, ensuring consistent evaluation.
Tips on Managing Files and Data
- Assignments for a course are stored under a dedicated folder called instructor-courses/<course code>/.
- This space does not get counted towards normal "home directory" quota,
- Multiple instructors have access to these files, allowing multiple markers.
- Access is course-specific, meaning you can only view and manage files for the course you're currently in. Files from other courses won't be accessible while working in this one.
- Instructors should collaborate and agree on how to share grading responsibilities outside of Noteable.
Typical assignment workflow
More detail is available for each step in the Create Assignment section below. Generally speaking, the workflow is as follows:
- Create a new assignment.
- Create/add content (question notebook documents, any given data).
- Generate the student version (and preview?)
- Special syntax fragments (see below) are removed
- If the generated notebook document is not as expected, you may edit the assignment files and re-generate.
- Release the assignment to students.
- Students fetch, complete, and submit the assignment (multiple submissions allowed.)
- Collect student submissions (most recent submission per student is collected.)
- Autograde submissions.
- Special syntax fragments (see below) are re-inserted
- notebook documents are auto-run, and points awarded based on pass/fail of tests
- Optionally manually mark, and add feedback to submissions.
- Generate and release feedback to students.
Overview of grading cell types
Cells that will be used to mark/grade work need to be identified - these are referred to as cell types.
Here is a summary of cell types available:
Autograded answer cells (code cells only):
- Use: cell in which student can answer a question.
- Marking: Marks assigned autograded test cells.
- Syntax: This type of cell may include solutions which are hidden from the student by use of special syntax (see below).
Autograded test cells (code cells only):
- Use: pass/fail tests (usually assert statements) that test student code.
- Marking: Marks are automatically assigned on an all or nothing basis, depending on whether all tests in the cell pass.
- Syntax: This type of cell may include some tests that are hidden from students (see below).
Manually graded task cells (code and markdown cells):
- Use: Tasks that may require an unknown number of cells or do not require any cells.
- Marking: Grade for task is input by marker at manual grading stage.
- Syntax: This type of cell may include a mark scheme, hidden from students (see below).
Manually graded answer cells (code and markdown cells):
- Use: Space for student answer. Usually used to follow tasks requiring a non-code response.
- Marking: Grade for task is input by marker at manual grading stage.
- Syntax: This cell type does not have special syntax.
Read-only cells (code and markdown cells):
- Use: Any cells that should be locked from student edits.
- Marking: This cell does not correspond to a task/response.
- Syntax: This cell type does not have special syntax.
nbgrader automarking syntax
Automarking syntax is included in the teacher version of the assignment (found in the source folder). The following syntax is used to annotate fragments of cell content for later processing:
Manually graded task cells:
=== BEGIN MARK SCHEME ===
Text between the markers is removed in student version, but visible to instructor in grading and feedback stages.
=== END MARK SCHEME ===
Autograder answer cells (code cells only):
### BEGIN SOLUTION
Specify solution inline. In student version, text between markers will be replaced with a code stub that raises not implemented error.
### END SOLUTION
Autograder test cells (code cells only):
### BEGIN HIDDEN TESTS
Code between these markers will be hidden in the student version, leaving blank space.
Hidden tests are marked by nbgrader during the autograding stage to assign marks to autograded code questions.
### END HIDDEN TESTS
(Note: These code-markers work because they are python syntax. For this reason, the grader system generally does not work well with other languages)
File organisation in Noteable with nbgrader
There is no separate "student notebook document" that needs to be maintained by the instructor. The appearance of the student version is controlled by the syntax (above) within the teacher version. This means that there is no need to edit any notebook document other than the instructor version in the "source" folder.
Once all steps in the assignment workflow are complete, the following folders and files will be available to instructors. Note that these folders are available to any instructor on that course, but only available when connected from that course.
- instructor-courses/<course-code>/<assignment_code>/source/ contains the original instructor version of the assignment. One assumes this contains working code (suitably marked up) and all tests pass.
- instructor-courses/<course-code>/<assignment_code>/release/ contains the generated (student) version. This will have all "marked up" sections removed.
- instructor-courses/<course-code>/<assignment_code>/submitted/<student_id>/ is the tree of submissions from students, when you collect.
- instructor-courses/<course-code>/<assignment_code>/autograded/<student_id>/ This is where the autograding results are stored and where the manual grading process looks for files during evaluation. These files will have had HIDDEN TESTS and MARK SCHEME content re-inserted.
- instructor-courses/<course-code>/<assignment_code>/feedback/<student_id>/ is where generate-feedback creates its files, and release-feedback looks to when you release the feedback - contains html feedback files for each student.
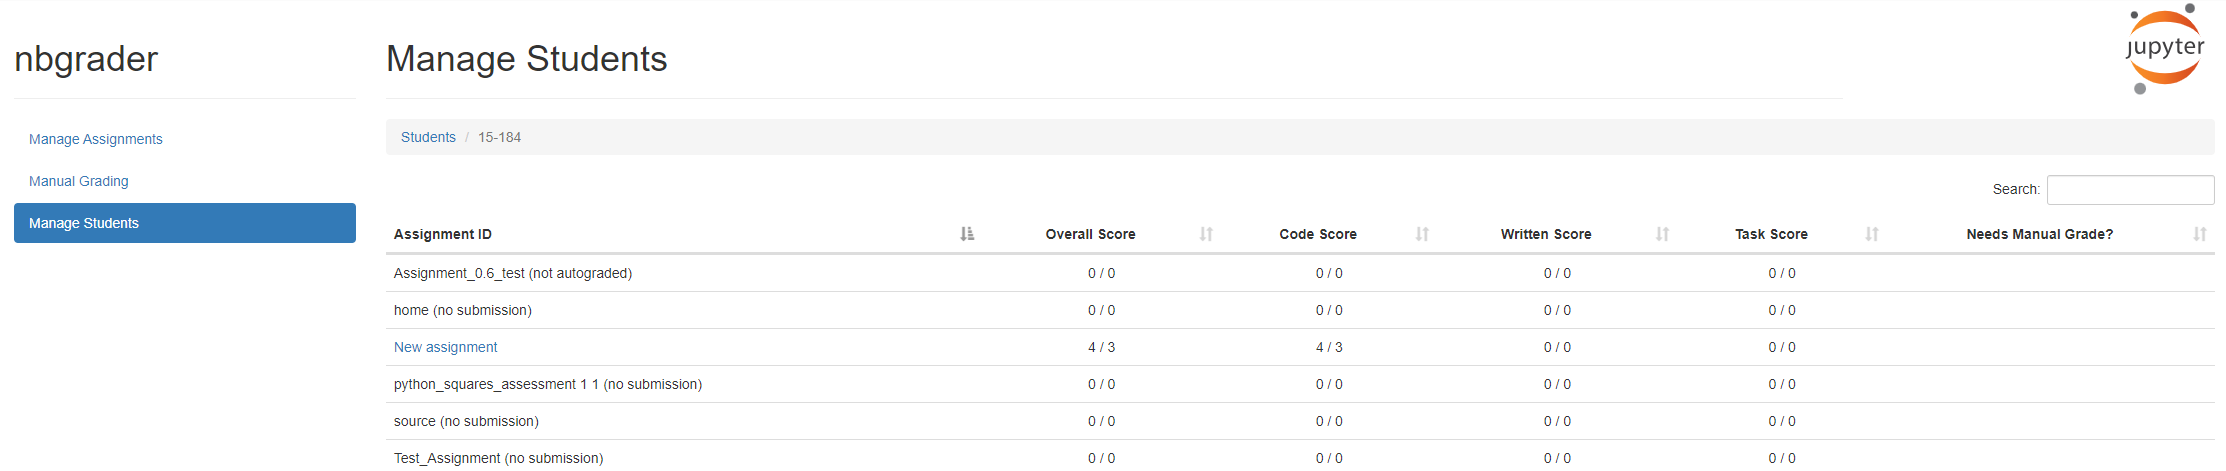
Information on student submissions and grades are found on the Manage Students tab.
Templates and Exemplars
There are several examples and templates to get you started in Noteable.
If you or your students are new to using notebooks, there is a quick start guide to interacting with Jupyter notebooks.
For transferring assignments to notebook format, please refer to the assignment skeleton which you can upload from the git repository and copy/paste questions.
To view an example assignment in notebook format, please refer to the assignment example.
If you are new to writing notebook documents, you may be unfamiliar with the markdown used. Noteable provides a cheat sheet for this purpose.
Additionally, Noteable provides a range of quick start tutorials which cover the following:
- Using the bokeh library for interactive graphs
- How to create bar charts in notebook documents
- How to create scatter graphs in notebook documents
- How to create interactive elements within notebook documents (such as slider bars)
Tips on writing assignments
In addition to the Creating assignments notebook, you can find some additional tips on writing an assignments.
Auto-grading and troubleshooting
Some times things just go wrong, usually for just one submission, and you need to figure out what's broken.
Read How to identify, and solve, when you can't autograde a submission if they do, to see if you can track down the issue.
Create an assignment
Creating an assignment from Formgrader and adding content
When logged into Noteable as an instructor, click on the Nbgrader tab and click on the Formgrader menu:
Once into the formgrader environment, Click Add new assignment… at the bottom of the table:
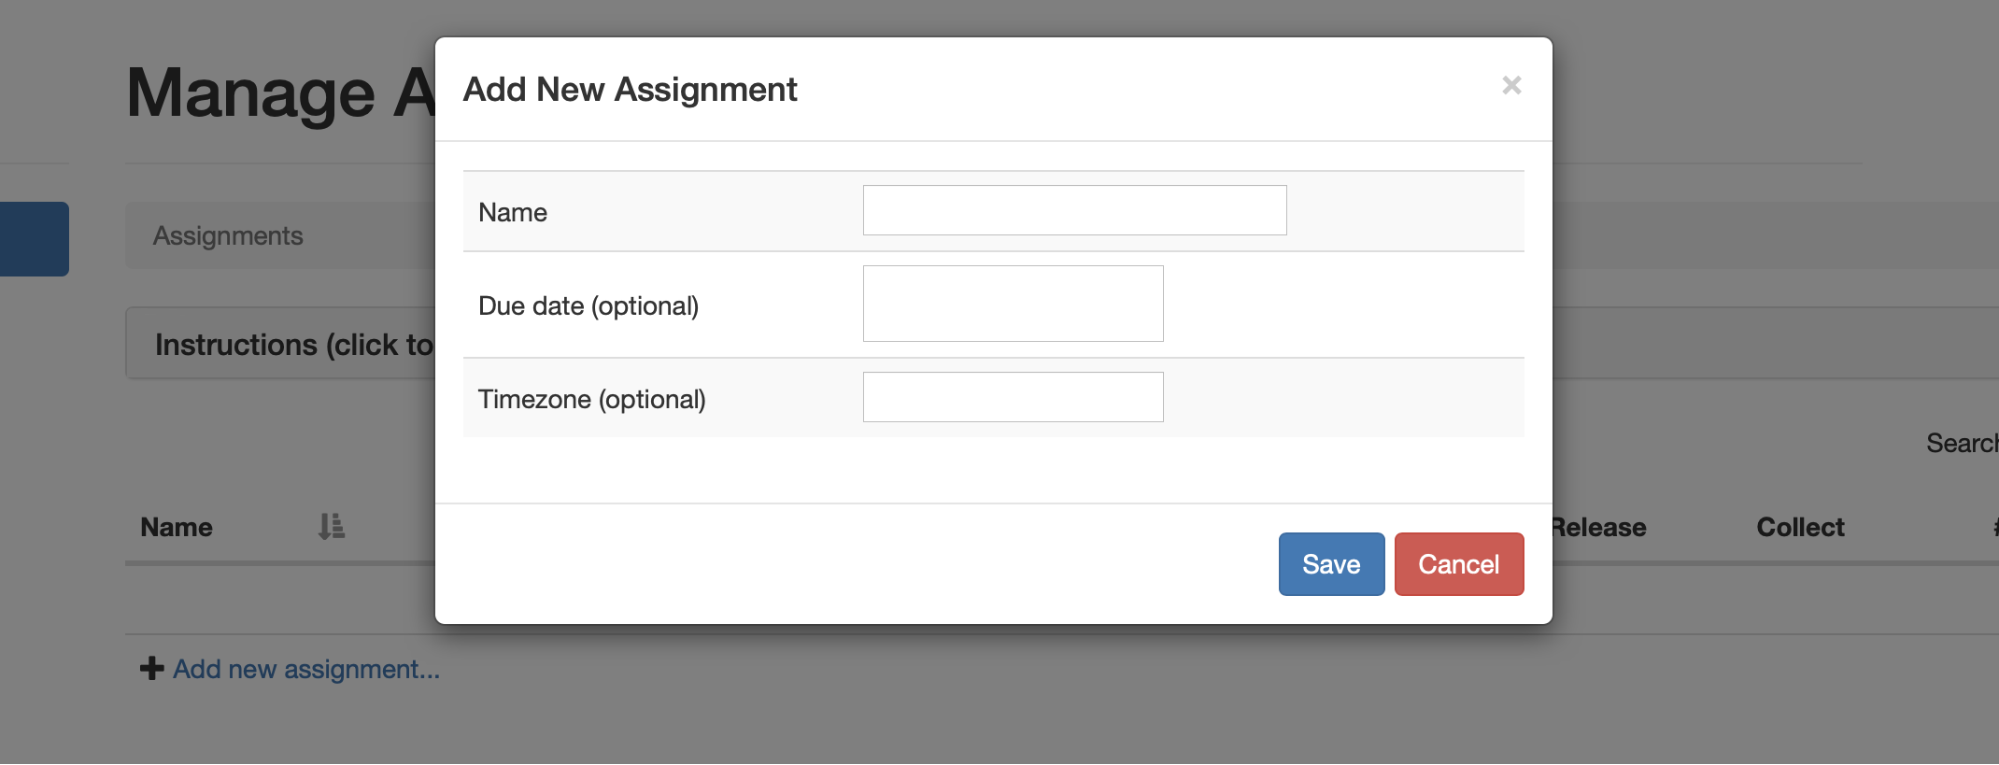
A pop-up will appear allowing you to input the name of the assignment, and optionally the due date and time zone. This information is later referred to as the metadata of the assignment. The name you give here will be the name of the assignment folder on Noteable. This folder will be released to students, and stores all the assignment files. When naming assignments, avoid any ?!@*%{}[]<>()/\"' characters as this can confuse the system later on.
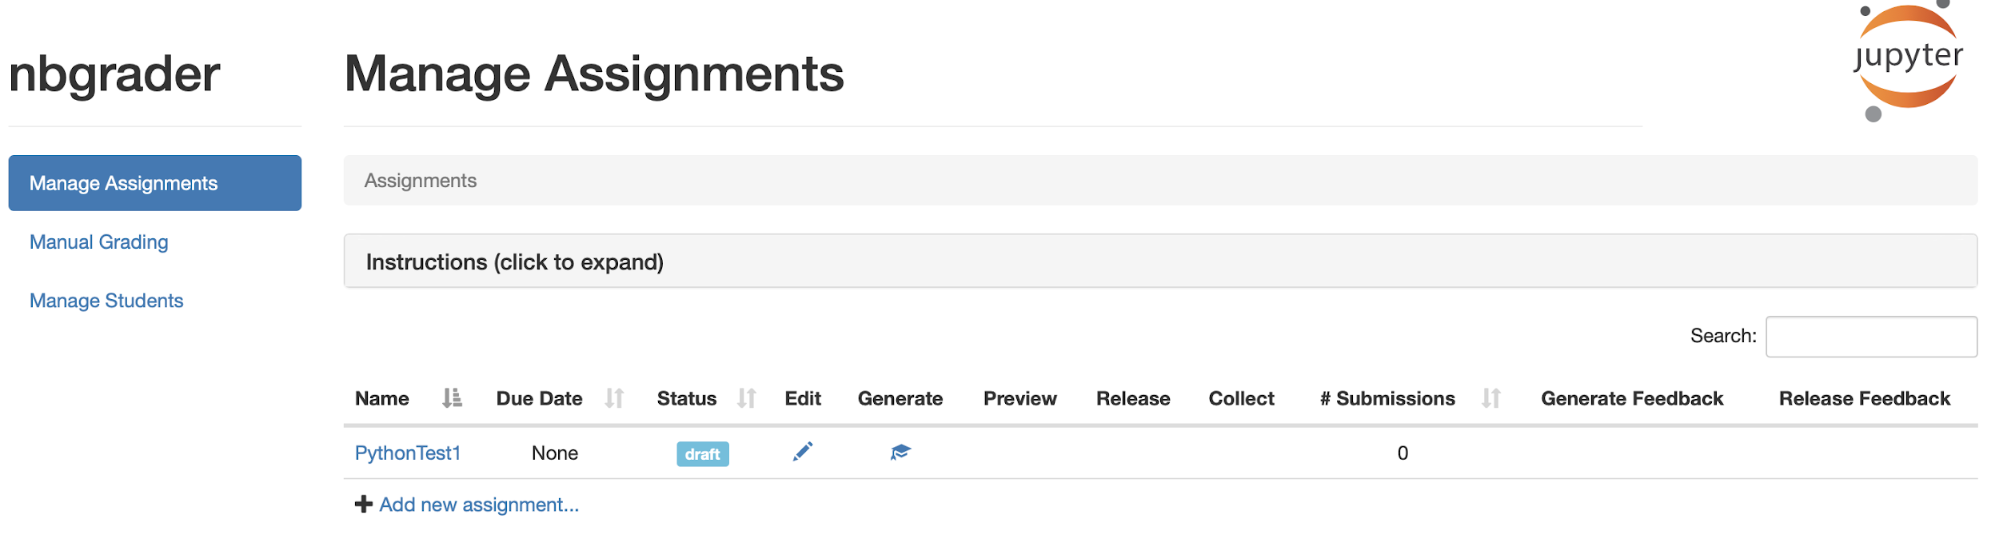
Clicking Save will add the assignment to Formgrader, and create the teacher version of the assignment (stored in the source / <assignment name> folder).
The assignment will appear in the Formgrader table, and the status will be set to draft:
Clicking the assignment name from this page will take you to the source assignment folder:
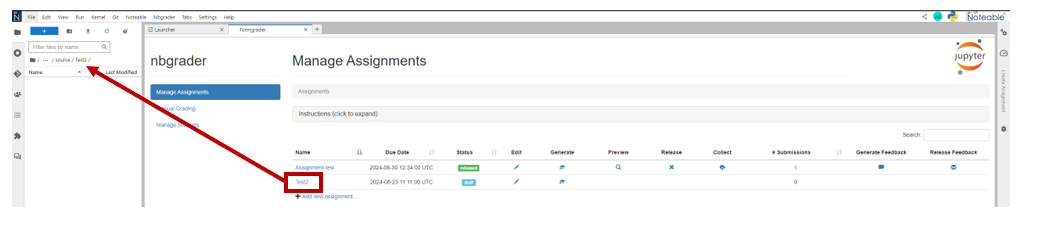
This is the teacher version of the assignment - the only version you need to edit. In this version, any special syntax that you add for solutions/tests/mark schemes will be visible. Later, in the Generate/preview step, a student view version will be created, but the teacher version is the only one you will need to edit.
You can add any files necessary for the assignment to this folder, such as data and one or more notebook documents (there must be at least one .ipynb file).
Note: If you are moving files from another folder in Noteable, you will not be able to move notebook documents that are currently running, you will need to shut them down first.
Creating grading metadata for notebook cells
For notebook document files that will be marked, cell containing must be added to structure information about:
- Whether the cell is automarked.
- Any mark schemes used.
- Any tests used.
- Points awarded for each question.
- Whether students are allowed to edit a particular cell.
To add this data to each appropriate cell, open an assignment notebook document (1) and click on Create Assignment on the right sidebar of your screen (2). Nbgrader refers to each notebook document cell having a corresponding menu (3).
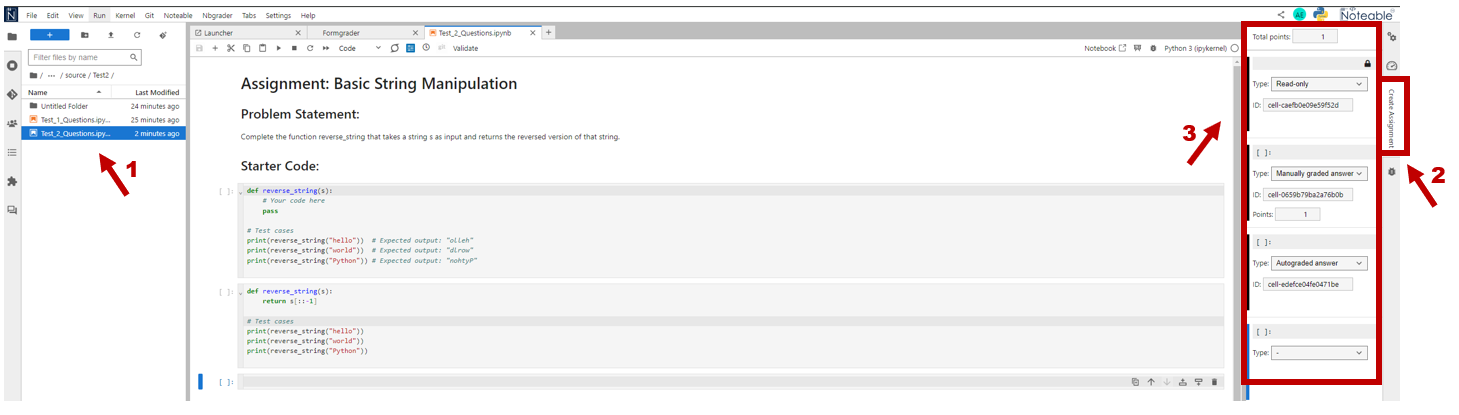
The correlation between the menu and the cell can be identified by the highlighted blue bar beside each of them.
Note that scrolling the notebook document does not auto-scroll the list of cell menus

Create Assignment, and thus the cell menus, are only available to instructors.
You can still edit the notebook as before, including adding new cells.
Clicking the dropdown list for Type in a cell menu will present a list of available cell types. The list of options differs slightly between markdown and code cells.
- Markdown cells may be tagged: -, manually graded answer, manually graded task, or read-only. For example:

- Code cells have a few more options: -, manually graded answer, manually graded task, autograded answer, autograder tests or read-only. For example:

Once you are happy that all cell menus have been assigned appropriately, move on to the preview and release stage.
The next few sections provide information on how to appropriately assign cell types and information.
Points and cell IDs
In cell menus, you will notice that some cells ask the number of points awarded. In automarked cells, this is all or nothing depending on whether all tests pass or not. For manual grading, this is simply useful information when manually grading.
Note that the point value of a cell is not visible in the student version. If you want this information to be available to students, you must include it explicitly within the cell.
Cells are given an auto-generated ID. You may wish to change the ID to help you identify tasks and associated tests: q4 and q4_tests for example, however this is not required in any way. Do not use the same ID for multiple cells.
Again, this information is not available to students, however it is shown when Manually Marking a submission.
Autograded answer and autograded test cells
Autograded answer
Autograded answer cells can be edited by students.
This option only applies to code cells, markdown cells cannot be autograded.
No points are associated with the answer cell, instead marks are assigned based on the autograder test cells that follow.
Special syntax is available for autograded answer cells. To include an example solution to the question within the autograded answer cell, enclose solution in the following syntax:
### BEGIN SOLUTION
Solution code
### END SOLUTION
When the generated version of the notebook document is created, this will be replaced by a code stub.
Autograded test
Autograded test cells cannot be edited by students.
This option only applies to code cells. The contents of this kind of cell are tests that pass or throw an error.
Points are associated with this kind of cell, assigned based on whether tests pass or fail.
Special syntax is available for autograded test cells. By default, tests will be visible to students unless enclosed in the following syntax:
### BEGIN HIDDEN TESTS
Test code
### END HIDDEN TESTS
When the generated version of the notebook document is created, the hidden tests will be removed. Given that hiding all the tests in a cell will result in an empty cell, it is generally wise to include at least one visible test to avoid confusion.
Points are assigned on an all or nothing basis depending on whether all tests pass or not. To achieve partial grading, split tests between two autograder test cells.
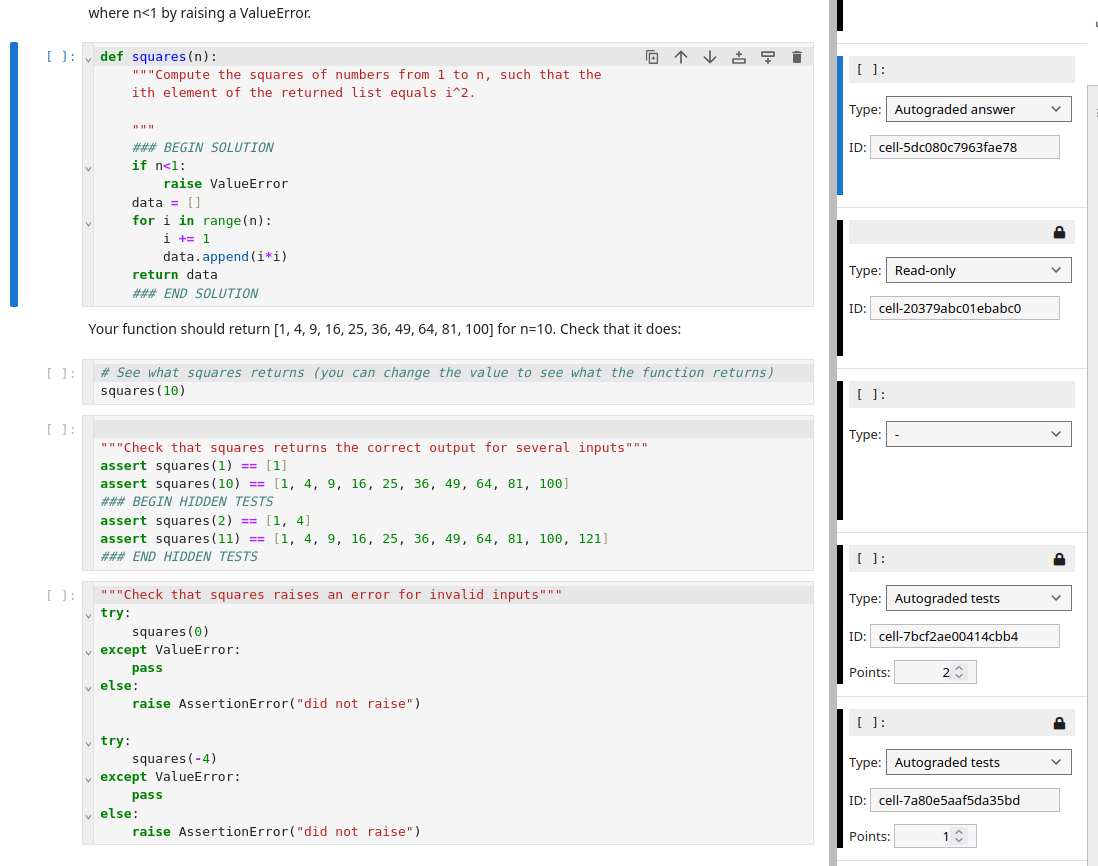
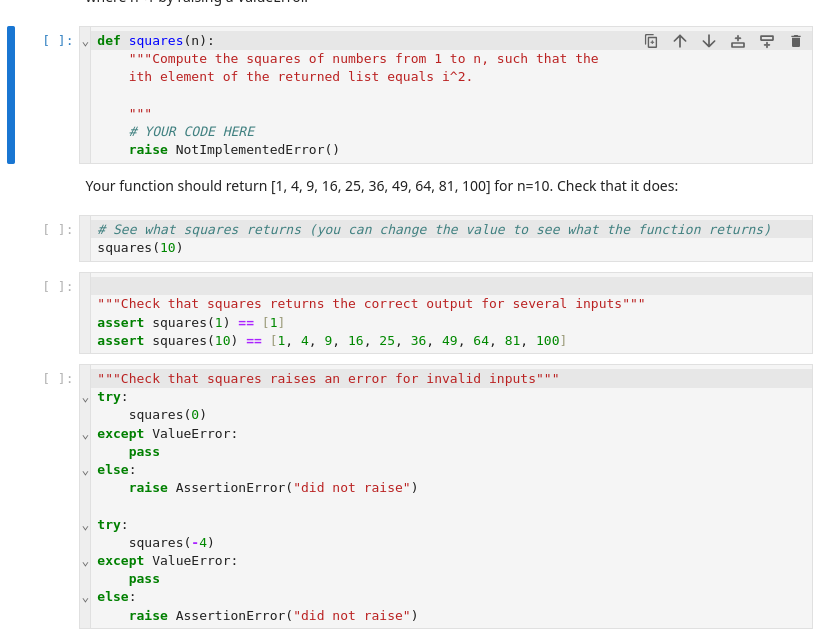
Here is an example set of autograded answer and test cells:
In this example, the student version will look like this:
Autograding version of notebook document
The autograding process copies the hidden tests back into the notebook before running it - this is what a marker will see during the Manual Grading:
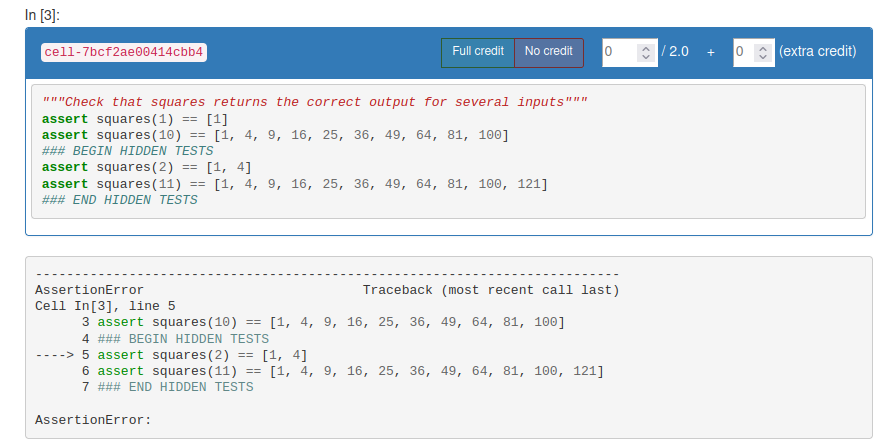
Students will be awarded 2 points if this first test is passed (including hidden tests), and 1 point if all tests in the second test are passed. Where a test is failed, no points will be awarded for that test cell.
For further information on writing good tests for these cells, refer to the nbgrader documentation regarding this.
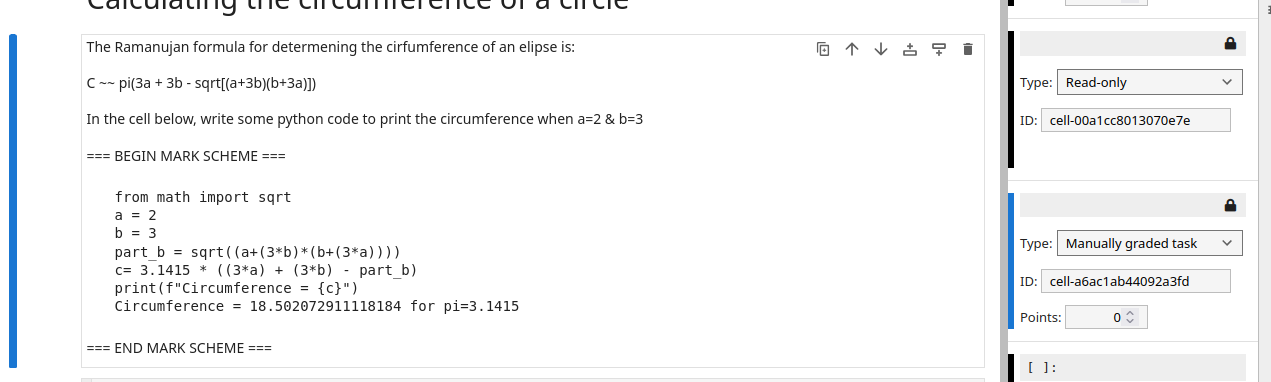
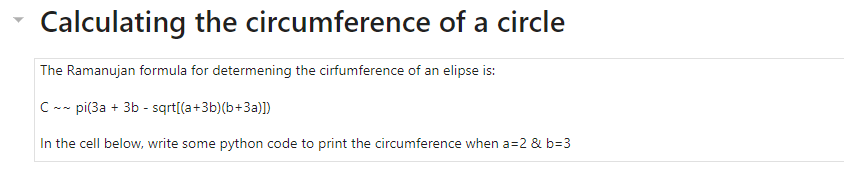
Manually graded task cells
Manually graded task cells cannot be edited by students.
This option can be used with either markdown or code cells and these cells are associated with points (partial grading possible).
This kind of cell is not automarked, a human marker will assign points manually.
This option is used for cells that describe a task that students must complete. There is not a specific cell in which students need to complete the task, therefore this kind of cell is appropriate for long answer questions requiring multiple cells, or cells describing tasks with a response that applies to the whole notebook.
For this kind of task, students may add any cells they require to complete the task.
There is special syntax to hide mark schemes within these cells:
=== BEGIN MARK SCHEME ===
Mark scheme here.
=== END MARK SCHEME ===
This can be useful at the marking stage, as the mark scheme is removed when the generated version of the notebook document is created, however re-inserted and available to markers when manually grading.
Here is an example use:
The student version of the cell above will look like this:
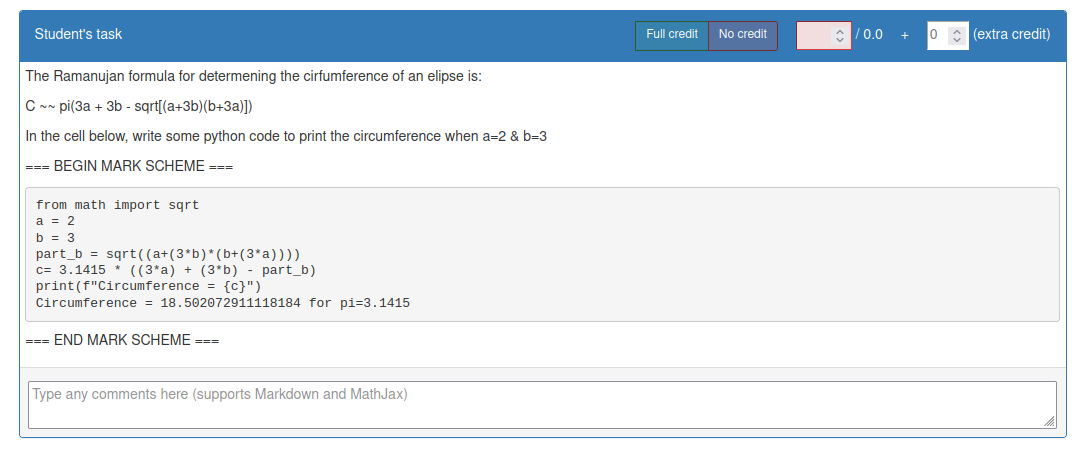
The autograding process copies the mark scheme back into the notebook document before running it - this is what a marker will see during the Manual Grading:
Manually graded answer cells
Manually graded answer cells can be edited by students.
This option is available for both code and markdown cells, and are associated with points (partial grading possible).
This kind of cell is not automarked, a human marker will assign points manually.
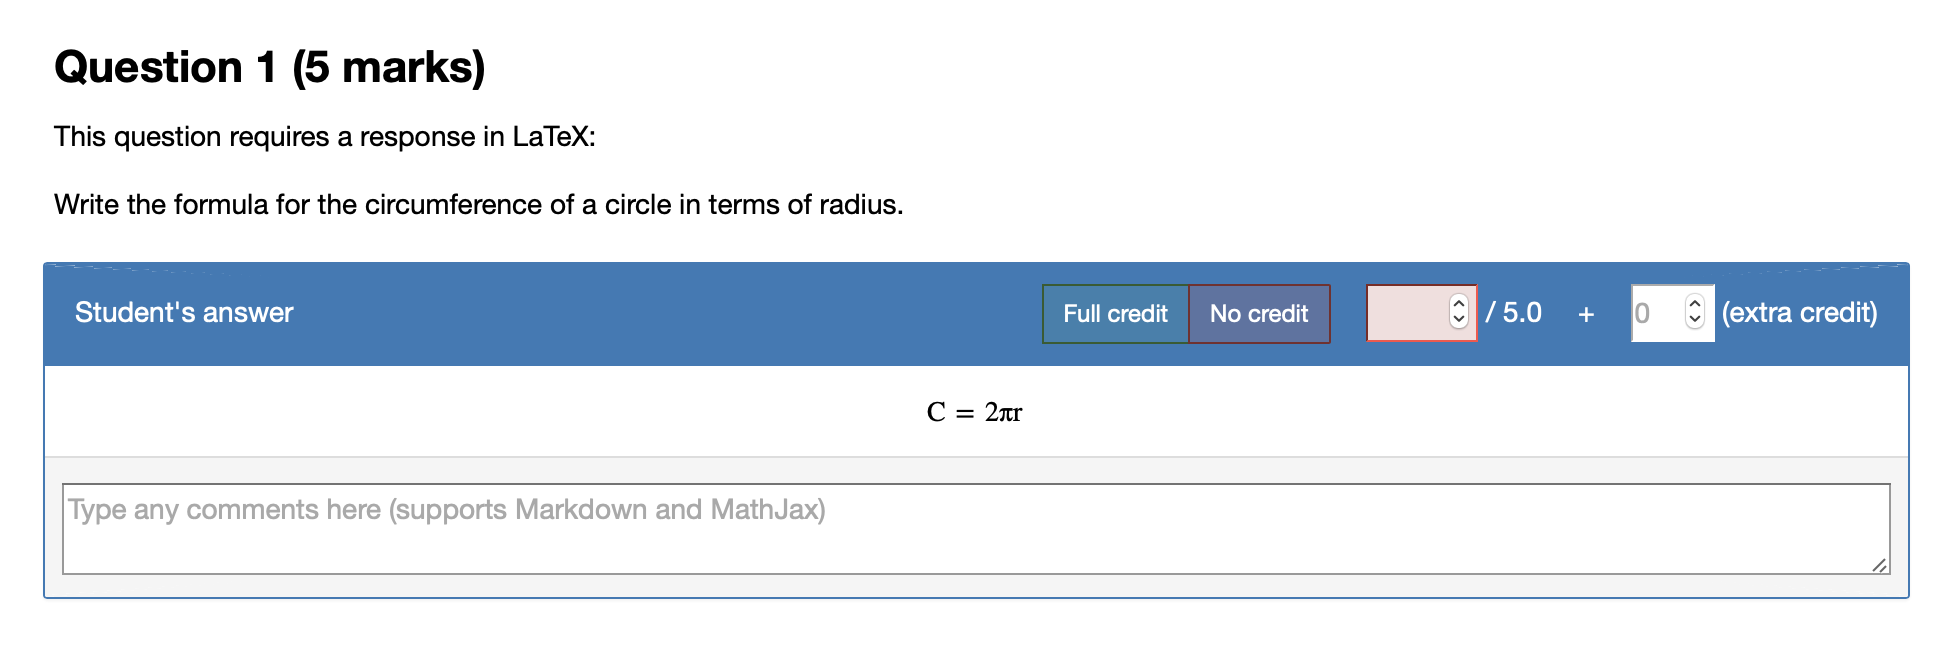
This option is used in student answer cells that cannot be automarked. In particular, this cell is appropriate when the student response appears in a specific cell, and is especially useful for written responses.
Here is an example, viewed from the teacher version of an assignment. In this example, a solution is included in the cell (no special syntax required) - this may be desired if further work in the notebook document is dependent on calculations here:

Here, the cell containing the corresponding question has been marked Read-only to prevent students from editing instructions.
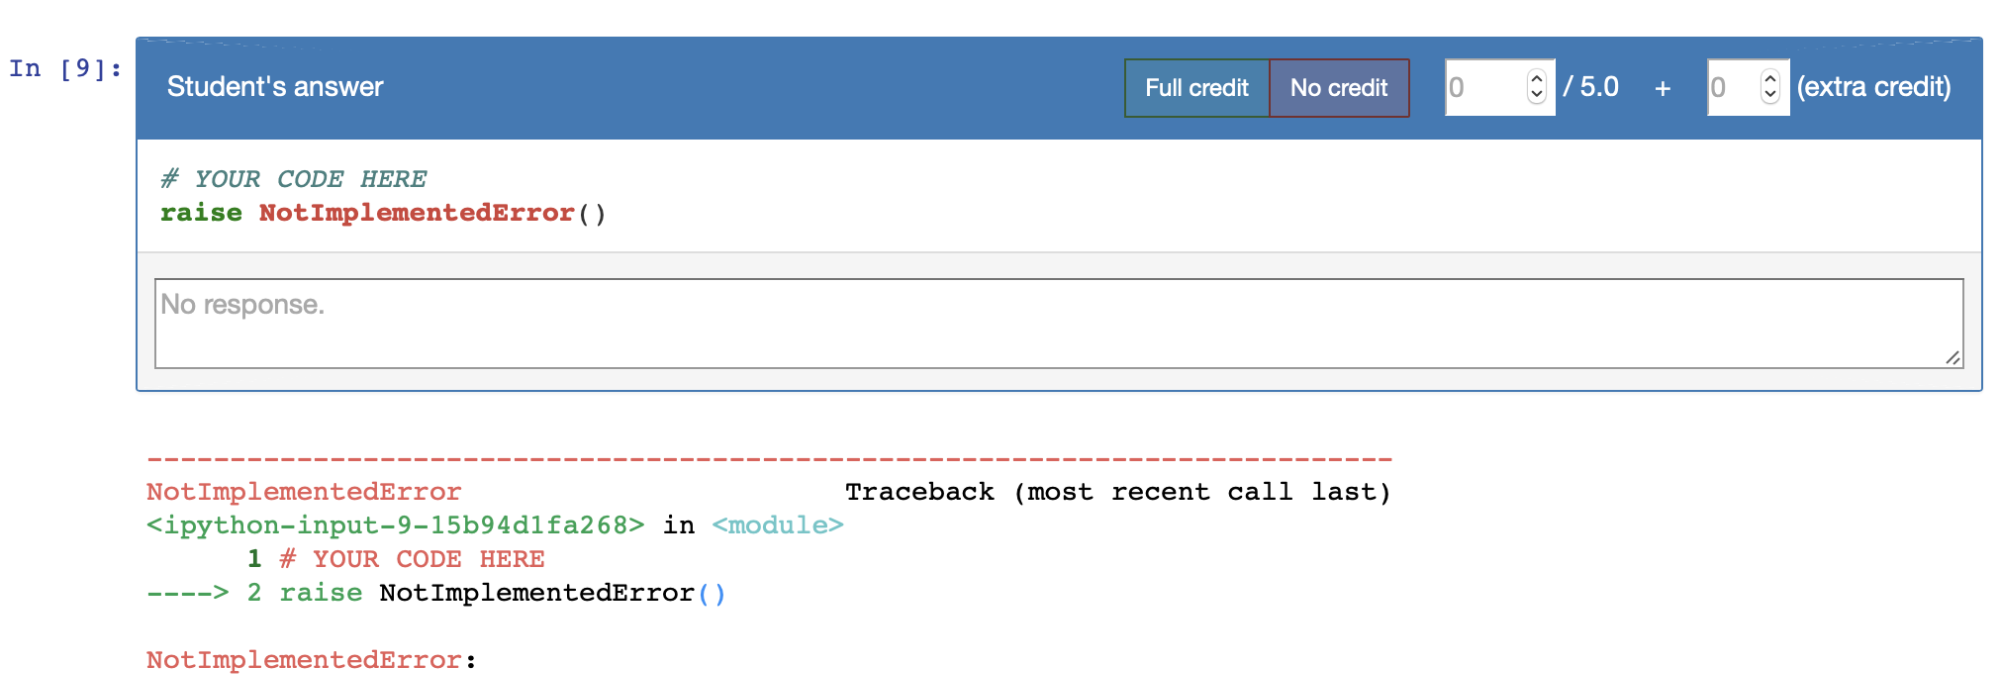
In the student version, the body of the answer cell will be replaced by a stub, so the solution can be included in the teacher version.
Here is the student version corresponding to the above example:

The autograding process does not modify the notebook document for these cells - a marker will see what the student submitted, and no more:
Read-only cells
Read-only cells cannot be edited by students. Both Markdown and code cells can be marked as read only. These cells are not graded.
This markdown cell gives some general information to the student therefore shouldn’t be edited or deleted by students:

Similarly, the contents of this code cell is intended for students to use in later cells, so shouldn’t be edited by students:

Generate/preview student version
Once you have completed the creation of the source document(s), you can create the version to be released to students.
Return to Formgrader and select the cap icon in the Generate column, which will produce a student version of the notebook document, stored in the "release" folder.

A log output will appear on the screen to confirm that the student version has been generated successfully.
The Preview and Release icons will become available in Formgrader:

Click on the "magifying glass" icon under Preview to list all the files ready to be released for this assignment (check the "breadcrumb" in the file-mananger panel is showing the source / <assignment name> folder.)
You can now check that the notebook documents look as expected. In particular, it may be valuable to check the following:
- Code stubs are expected.
- Solutions are hidden as expected.
- Tests are visible/hidden as expected.
- Student version allows/disallows editing of cells as appropriate.
- Cells containing hidden tests in the teacher version also contain visible information in order to reduce likelihood of student confusion.
If you need to, you can edit the <source> version as needed, repeating the generate and preview steps as many times as you wish.
Release and collect an assignment
Release the assignment to students
From the Formgrader menu, press the cloud icon in the Release column to make the assignment available to students:
A log output pop-up will confirm that this has been done successfully.
The status of the assignment will change to "released":

Your students will now be able to fetch, complete and submit the assignment - this is covered in the separate Student guide.
Collect student submissions
Press the collect button from Formgrader to retrieve all submissions:

You may collect the assignment as many times as you wish.
The number of submissions collected at any point is shown in the # Submissions column.
Clicking the number in #submissions column will take you to the Manage Submissions page:
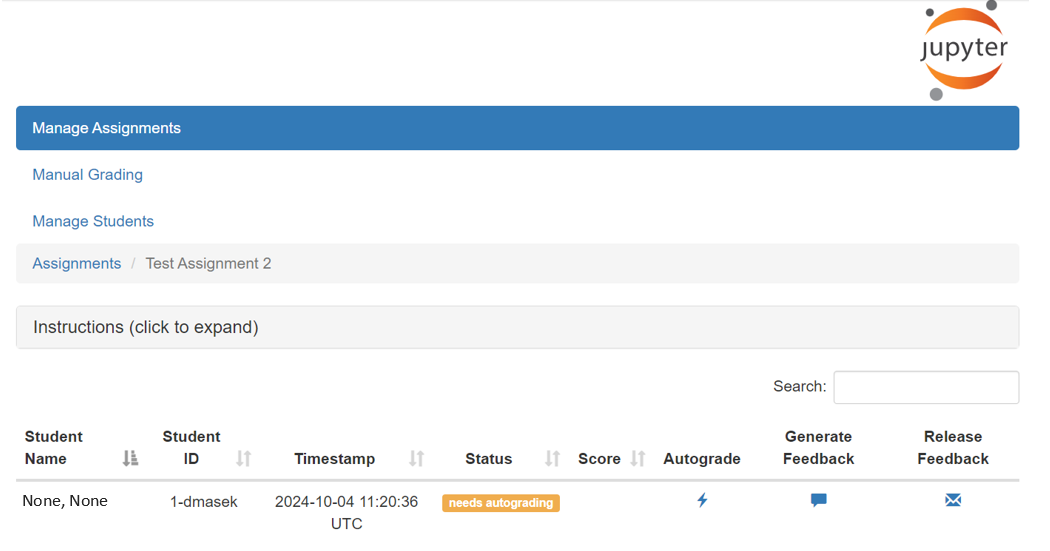
This will be a list of all submissions for that assignment. Names (if known) and IDs of students that have submitted the assignment will be displayed.
The assignments, in this case just one submission, have now been collected but not yet marked (notice the Status column which reads "needs autograding").
Re-releasing assignments
Re-releasing assignments to students
An instructor may wish to edit an assignment or add data files after it has been released and fetched by students on a course. Please note that students cannot re-fetch assignments if they already have the assignment - To re-fetch an assignment, a student needs to delete (or rename) the assignment directory (it will be <Course Code>/<Assignment Name>) and then it will reappear in their Released assignments list.
Note that students who have already started the assignment will lose the work they have done if they need to re-fetch the updated assignment.
We strongly advise against this approach. It is generally better to create & release the update as a new assignment.
Marking and feedback
Autograding step
Once student submissions have been collected, the assignment can be marked.
Autograding is done one student at a time. (The submission from the entire cohort can be autograded in one go, however this can only be done from the command line. We leave this as an exercise for "power users" to explore.)
From the Manage Submissions page, work down the list of students and press the lightning bolt in the Autograde column in order to autograde the submission. Any autograded cells will be assigned marks.
A log-output pop up will confirm that the autograding step has been successful, and the status of the submission will change to needs manual grading. The score of the automarked cells is displayed in the Score column:

Manual grading and feedback step
Both manual grading and adding optional feedback are done through the same process. (Note there is no command line for this: manual grading & feedback have to be done through the formgrader interface.)
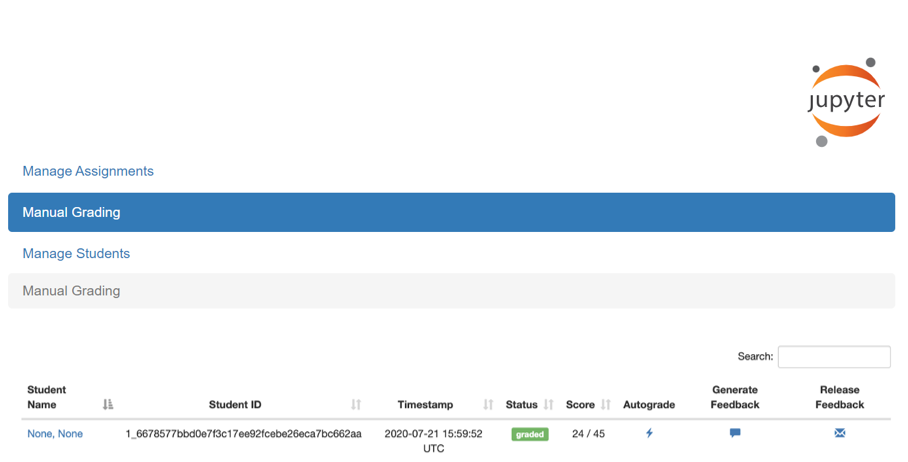
Click the Manual Grading tab on the left hand side of the Formgrader menu screen, and the Manual Grading table will display a list of assignments:
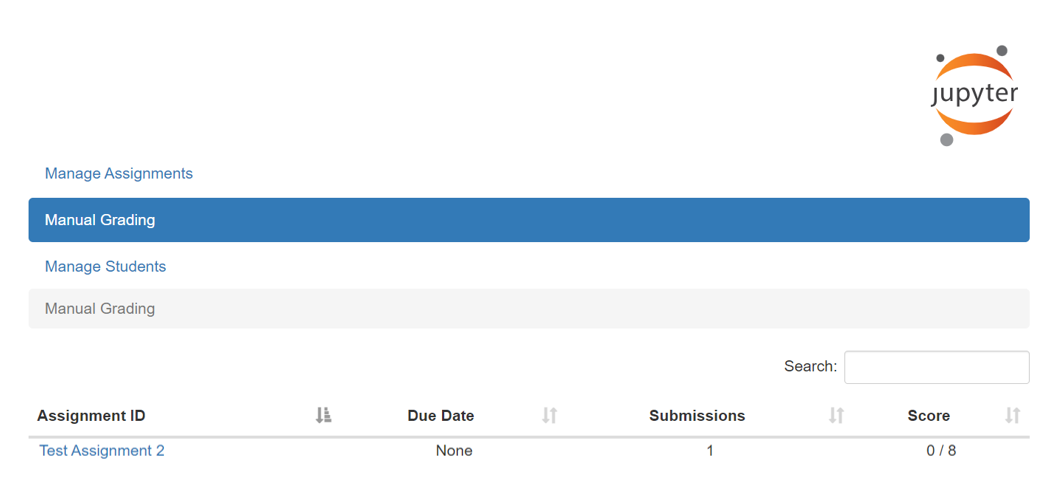
Select the desired assignment to see the list of notebook documents:

Select the desired notebook documents to see the list of submissions:

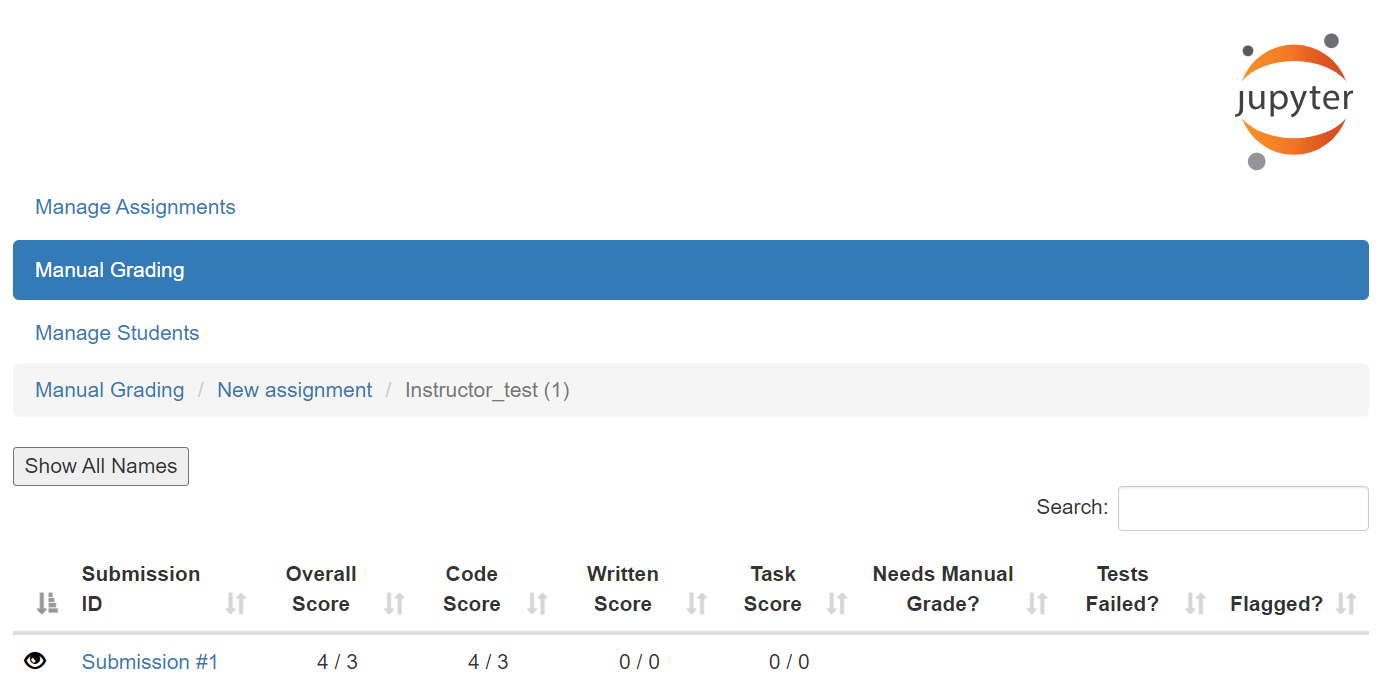
You will now see a table of all the submissions for this notebook document in this assignment.... anonymised.
Here, information is displayed on the grade breakdown, as well as a tick icon in the Needs Manual Grade? column.
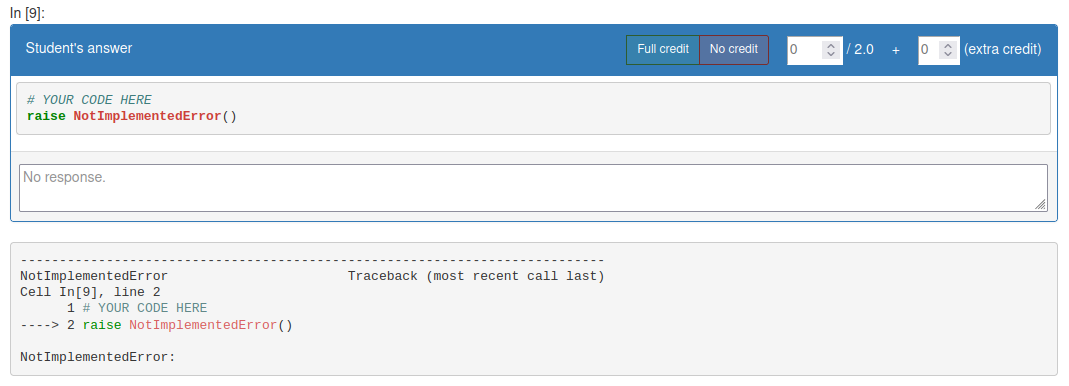
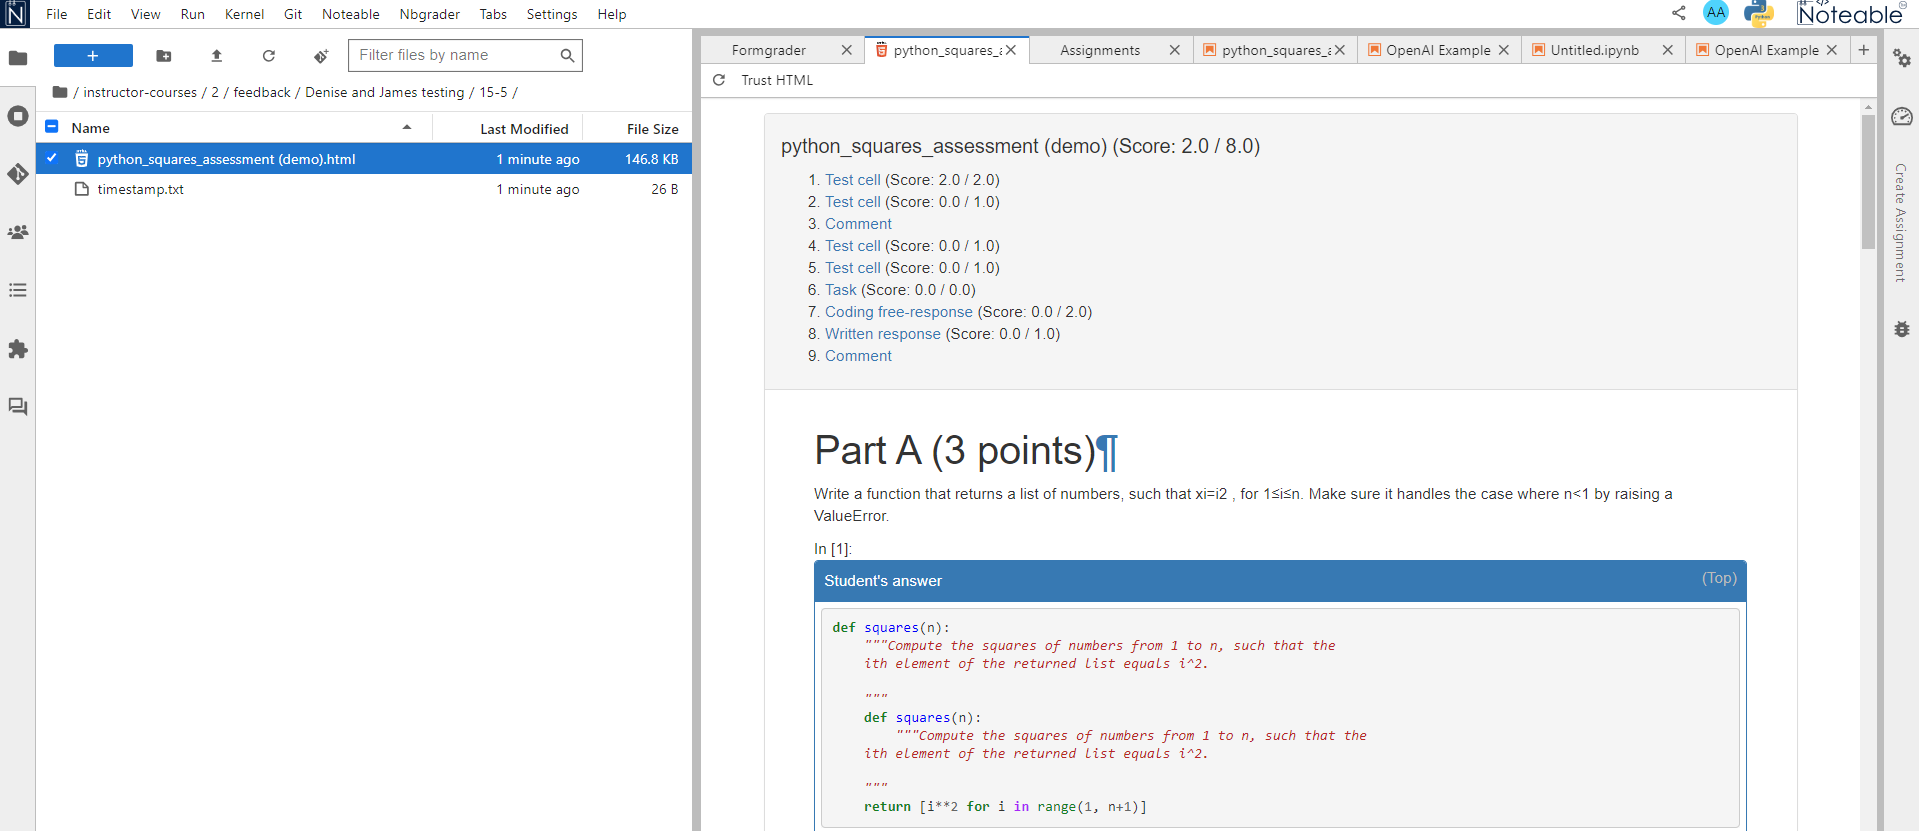
Click on the submission entry to view the individual piece of submitted work. From each individual submission notebook document, manual marks and feedback can be added using the toolbar above each cell:
Note: Information that is hidden in the student version (for example mark schemes) will be visible to the marker at this stage.
Notice that autograded cells already have points assigned to them, and that graded cells are automatically awarded 0 if the student does not provide a response:
Once you have finished marking the student's work, press next in the top right hand corner of the screen to move onto the next submission.
Pressing next on the final submission, will return you to the Manual Grading menu on Formgrader:
Release feedback to students
Return to the Manage Assignments tab on the left hand side, and click the number in the # Submissions column to show the list of submitted work.
Feedback can now be generated by clicking on the speech bubble icon in the Generate Feedback column. A log output pop up will appear to confirm that this has been successful.
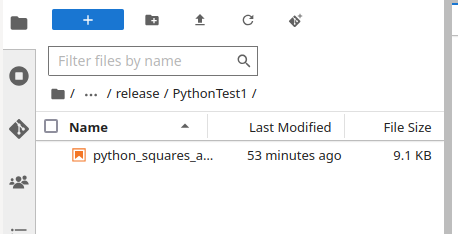
Going back to the Noteable launch page, you will see that there is now a feedback folder. Clicking on this folder will take you to a list of folders named by student ID:

Clicking on an individual student's folder will show all available feedback for that student. In particular, an HTML file containing the grades and feedback for the named assignment:
As the instructor, you are able to view this file by clicking on it.
Once you are happy with the feedback document, return to the Formgrader menu and press the envelope in the Release Feedback column to make the feedback available to students.