
Standard User Guide
This quick reference guide is designed for all Noteable users, providing an overview of essential functions such as logging in, starting and shutting down a Notebook Server, accessing the terminal, creating folders, uploading and downloading notebook files, and navigating both the homepage and notebook interfaces. Whether you are new to Noteable or looking for a refresher, this guide covers the basics to help you get started.
Getting Started
This section offers a quick guide to help new Noteable users with basic functions like logging in, managing a Notebook Server, and using essential features.
Starting up a Notebook Server
When you click a link to Noteable, you'll probably see the following screen. Some of the text on the screen may be different. The important thing to look at here is the dropdown menu. If this is your first time using Noteable, and you would like to follow this walk through, then set this to Standard Python 3 (click on the down arrow to see all options). Then press the Start button.
Great! You've just started your first Standard Notebook!
What is a Standard Notebook and what is the alternative?
The Standard Notebook gives access to JupyterLab and Python 3. You can scroll through other options on the notebook selection list to see other Notebook Servers available. You can start any Notebook Server you would like when you log in - your folders and files will still be there regardless of which Notebook Server you choose.
There are different Notebook Servers you can start depending on what programming language you would like to code in, or whether you need specific libraries for your code.
The list of notebooks, and what they do, is listed on the notebook contents page.
If you require a different type of Notebook Server (i.e. need specific libraries or another type of kernel) get in touch with Noteable to discuss the possibility of developing such a Notebook for you.
There are different notebook servers depending on what specialist needs you may have - be it R or Sage rather than Python, or a suite of subject-specific libraries (Astronamy, BioChemisty, Machine Learning, etc). The notebook-descriptions page would be more useful that the high-level notebook-contents page, when seeing that the different notebook servers actually provide.
Is this notebook associated with my account or this session? Is everything in it going to disappear next time I log in?
The files and folders you see when you start a Notebook server are yours to keep. When you log in (assuming you use the same account each time) your folders will be there waiting for you. We'll talk about saving your work later. But for now, it's just important to understand that if you did some work, closed your browser, and followed the steps above again in a few days, your work would still be there.
I clicked on the wrong type of notebook, how do I get back?
You can click the Noteable logo on the top right of the screen to get back to the launch page and choose a new Notebook Server from the dropdown menu. Before you can start up a new Notebook, you need to shut down your current Notebook.
Alternatively, you can close down Noteable and go back into it. Shut down the current Notebook Server then choose the desired Notebook from the dropdown menu.
Creating a folder
A folder can be used to group lots of different files, just like on your computer. To create a new folder, just click on the little folder symbol on the top left of the page. You will be prompted to rename your new folder with a title of your preference.
Folders follow the same naming conventions as directories on a typical computer. Please avoid using any of the following characters in folder names: ?!@*%{}[]<>()/\"', and refrain from starting names with a space. Remember, folder names are case-sensitive, meaning Foo and foo are treated as different folders. Lastly, due to the limited screen space when listing folders, it's best to keep names relatively short—around a dozen characters is ideal. Ensure consistency in your examples: if you create a folder called BiologyProject, stick with that name throughout your instructions to avoid confusion (e.g., avoid switching to "PracticeFolder" later on).
To rename your folder, just replace the text "Untitled Folder" with the name of your file and press Enter. You have just created an empty folder, and named it!
When you choose a name for folders or files, you should:
- If the name of your file contains several words, try capitalizing the first letter of each word or using "_" instead of spaces. For example: "BiologyProject" or "Biology_project".
- Try to give the folder or file an informative name - if it contains code for a Biology project, call it "BiologyProject".
Click on the folder name to have a look at what's inside.
The path to any files you create or upload into this folder will be "home/jovyan/BiologyProject".
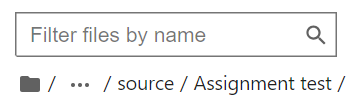
It's easy to remember the path if you only have one folder, but if you have a more complex tree of folders, you can find out the path all the way from the home directory to your current location from the path structure above the folders. You can also search for a file using the "Filter fills by name" box.
Starting a notebook from scratch
You can create a notebook in three different ways:
Click on the plus sign on the blue box on the top left of your notebook:
Click on the plus sign beside the notebook that you have open or, if no notebook has been open yet, click on the plus sign on the right of the Launcher:
As you can see, both the plus sign on the blue box and the plus sign beside the notebook you have open opens a new Launcher tab from which you can start a notebook.
For the third option, click on the File dropdown menu on the top left banner of your screen and then New:
There are several templates and example notebooks available from the Noteable exemplars repository to get you started . If you or your students have never used notebooks before, it may be useful to refer to the beginner guide notebook which outlines the basics of interacting with notebooks.
The terminal
If you are a Unix user, you may be familiar with terminals. There are three different ways to create a new Terminal on Noteable:
Click on the plus sign on the blue box on the top left of your notebook and then Terminal to get one running:
Click on the plus sign beside the notebook that you have open or, if no notebook has been open yet, click on the plus sign on the right of the Launcher and then Terminal:
Note that, both the plus sign on the blue box and the plus sign beside the notebook you have open opens a new Launcher tab from which you can start a terminal.
Click on the File dropdown menu on the top left banner of your screen, hover over New and then choose Terminal :
You can also run commands from a notebook code cell by prefacing the command with !.
Note: exercise caution when issuing commands that require further input from you on the command line - this will usually be easier to do by opening a terminal.
Pre-installed packages within Noteable
The coding environments available in Noteable have a wide range of libraries pre-installed, which you can access throughout a subscription. To view a high-level description of the available notebook servers in Noteable, visit the Notebook Descriptions section in the Resources area. This section provides detailed descriptions of our different notebook servers.
To check which packages are included in each notebook server, you can log into a notebook server, open a Terminal, and run the pip list command [Alternatively, you can run the same command in a notebook server using the `!`-notation]. The pip list command is particularly useful as it displays all the libraries, including those installed as dependencies.
To view a high-level description of the available notebook servers in Noteable, visit the Notebook contents section in the Resources area: our different notebook servers.
For more information on how to access and use the terminal, refer to the subsection labelled The terminal.
How can I install my own packages on Noteable?
Additional packages can be installed from the terminal or from within a notebook (prefacing commands with !). For information on how to install your won packages, go to Can I install my own packages on Noteable? in the FAQs page.
Moving file to a folder
To move a folder, the easiest method is to use the drag and drop feature. Simply open your file browser in Noteable, click and hold the folder you want to move, then drag it to the desired location in the file tree. Once you reach the correct spot, release the folder to move it.
Another option is to cut and paste. Right-click on the folder you'd like to move and select Cut from the menu. Navigate to the new location where you want to place the folder, right-click again, and choose Paste. The folder will be moved to this new location.
If you prefer working with the command line, you can use the mv command to move folders. Open a terminal within Noteable, and enter a command like mv /path/to/your/folder /new/location/. This will move the folder to the specified location.
File paths
When loading or reading data files in a notebook, you need to specify the path to the data file you would like to access. Therefore the relative location of the data file with respect to the notebook file is important, otherwise the code will generate an error. The easiest method is to store the data in the same directory as the notebook file. If the notebook Notebook1.ipynb and data files data.csv are located in ~/folder1, you can use "./data.csv" within the notebook. You can use "../data.csv" if you need to go back one directory to reach the location of the data file.
Saving your work in a notebook
Saving a notebook in Noteable is simple and convenient. One of the key features is automatic saving. Noteable continuously saves your work as you make changes, so you don’t have to worry about losing your progress. This background saving happens periodically as you edit, ensuring your work is always up to date.
If you prefer to manually save your notebook at any point, you can do so by clicking on the File menu at the top of the screen and selecting Save Notebook. This action ensures that all recent changes are saved immediately without waiting for the automatic save.
Additionally, if you need to create a copy of the notebook under a different name or save it in a different location, use the Save As option. By selecting File > Save Notebook As, you can rename the file or choose a new directory to store it. These saving options ensure your notebook is safely stored and accessible whenever you need it.
Downloading a notebook
To download a notebook from Noteable, you can right-click on the file within the folder structure and select Download, or navigate to the File menu and click Download to save the notebook as a Jupyter source file (.ipynb).
Shutting down your notebook/Noteable
Shutting down your notebook means you are shutting down the kernel within the notebook, so that it stops running in the background if you aren't working on it. If you have the notebook open in a new window, you can shut it down by selecting Close and Shut Down Notebook from the dropdown list under File.
Shutting down your Noteable means that you are ending your current session. You can do this by clicking on the Noteable logo on the top right when you are on your launch page. This takes you back to the starting page where you chose the type of Notebook Server you wanted to use. If you click Shutdown here, you will end your session and any packages you installed will be lost. You can also return to the Launch Page from the Noteable menu. This can also be done from the Noteable menu.
User Interface of Jupyterlab
If you are new to Noteable (but even if you have been using it for some time), there are some especially useful (somewhat) hidden functions in the application. This section will give an overview of all the menus, logos and buttons and how they contribute to the interactiveness of the UI as well as the file structure in Noteable.
Files and folders
Folders in Noteable work in a similar way to folders on your computer (like in finder, or windows explorer). Folders are there to hold files, and sometimes other folders, which will hold files (folders all the way down)... To find more information on creating folders in Noteable, please refer to the subsection labelled Creating a folder.
Standard jupyterlab application page
When you start your Standard Notebook, (if unsure how to do this, refer to the subsection labelled Starting up a Notebook Server), this is what you will see:
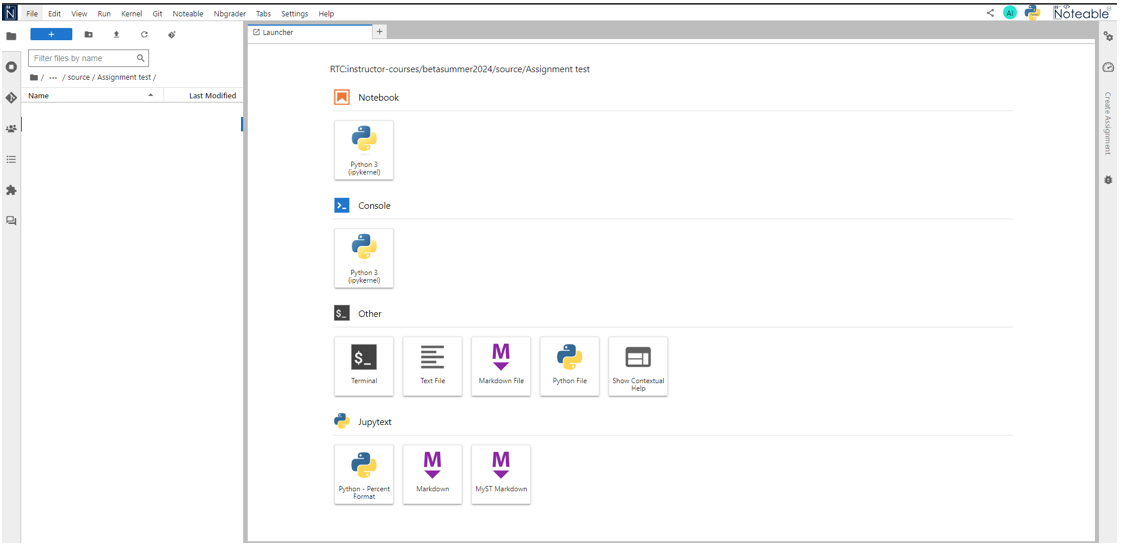
Components of the jupyterlab application page
The application has 5 main components: a menu, the main work area, left & right panels, and a status bar at the bottom.
Application menu
The description below shows a summary of what is in the application menu. For more detailed view of what you can find in each menu, please go to Menus in the Jupyterlab interface.
- File: Allows you to create, open, save, or close notebooks and other files.
- Edit: Offers options to cut, copy, paste, and undo changes in your notebook.
- View: Helps adjust the notebook layout, including hiding/showing certain panels.
- Run: Runs your code or specific cells in the notebook.
- Kernel: Lets you restart, interrupt, or change the notebook's computational engine (kernel).
- Git: Integrates with Git for version control, allowing you to commit and track changes.
- Noteable: Provides access to Noteable-specific features like assignments and settings.
- Nbgrader: Manages assignments and grading tools.
- Tabs: Allows you to manage open tabs.
- Settings: Adjust general settings for your notebook environment.
- Help: Provides help and support for using Noteable.
Main work area (Middle of the Screen)
The man work area revolves around the Launcher tab. This has a set of buttons for starting various services / components:
- Notebook: Here, you can launch a new notebook for Python 3.
- Console: Allows you to open a Python 3 console for running code without using a notebook interface.
- Other: Options to open a terminal, create text files, markdown files, or Python files.
- Jupytext: Additional formats to open notebooks, such as Python scripts and Markdown-based notebooks.
See jupyter's own documentation on the Main work area for more information.
Side Panels (File Browser, et al)
- The left panel is predominantly used to show the file tree, where you can browse your folders and files. You can click on any folder or file to open it. There is also a filter box to search for specific files by name. For more information, go to Creating a folder
- The right panel contains access to debugger and inspection tools. It is also where the Create Assignment tool sits, for course-instructors.
See jupyter's own documentation on side panels for more information.
Important logos and graphics in the appplication
There are 4 significant logos in the top-right corner of a notebook server (Note: RStudio and Legacy notebooks are different).
- The first two relates to collaboration: The symbol enables Collaboration, and the two letters in the blue circle are related to Collab but not used;
- The second-last next icon is an indicator of the notebook server started and will be different in Astronomy, GeoSpatial, etc.;
- Lastly, the "Noteable" logo is a link back to the launch page.
If you are unsure how to do this, please refer to the subsection labelled Shutting down your notebook/Noteable.
Components in the left panel
Below is a guide to the key features available in the Jupyter notebook interface, designed to help you manage your files, collaborate with others, and enhance your productivity.
- Folder: Access and manage all your files and folders within the notebook environment by clicking here.
- Running Terminals and Kernels: View and manage currently active terminals and running kernels in your notebook.
- Git: Manage version control by syncing, tracking, and handling changes in your Git repositories directly from the platform.
- Collaborate: Shows you how many people you are collaborating with, and which documents you are sharing with them. Note that Noteable has no mechaism for attributing users, so the collaboration system autogenerates anonymous names.
- Table of Contents: This creates a table of contents based on markdown heading levels.
- Extension Manager: Lists the currently installed extensions, and allows new extensions to be installed. Note that user-installed extensions to not remain beyond the current session.
- Jupyter AI Chat: Enables the user to configure an AI "chat bot" to interact with. Note that Noteable does not provide any API keys in notebook servers.
File structure
In Noteable, the folder structure is designed to help you organize and manage your projects efficiently. When you open the platform, you'll see a list of directories and files displayed in a hierarchical view, similar to a traditional file system. You can easily navigate through this structure by clicking on individual folders to explore their contents. You can create new folders, upload files, rename items, move them between directories, and delete files or folders as needed. With the Folder section in the toolbar, you have all the tools to keep your workspace organized, making file management intuitive and efficient.
Uploading a Notebook
For this section, it is assumed that you have a file that you'd like to open on Noteable. The file name should end in the extension .ipynb (the extension for notebooks).
Make sure the .ipynb file is either:
- downloaded on your computer (and you know where it is)
- on a github repository, a storage space for your projects on an online host - (grab the link to the repo and make sure you have it)
In this section I'm going to show you how to upload a file from your computer and use the following public github repository https://github.com/robyngreene/tutorialsNoteable.git to show you how to upload a repository using git.
Hopefully you have opened up your standard notebook if not, go back to Starting up a Notebook Server. It's a good idea to read over the UI guide if any of the buttons look unfamiliar.
Upload a notebook from your computer
If you haven't already, download or create the notebook file (name ends in .ipynb) that you would like to upload to Noteable - make sure you know where it's downloaded on your computer. Once you've followed the steps to Starting up a Notebook Server, and have reached the screen below, click Upload. You can select the file from the files on your computer. So go to the location that the notebook was downloaded into on your computer and select it. The notebook is now within your Noteable directory and you can click on it to open it.
Don't worry you don't have to do this each time you start up your Noteable, the file you just uploaded will be stored there, as long as you don't delete it.
Using git within Noteable
If you are using git to upload a new file, there are four main options for you to do this within Noteable:
- Using the Git menu,
- Using Git in the left panel,
- Using git through the terminal within Noteable,
- Using git from the notebook interface (within a cell of a running notebook) by using "!" magic to execute a shell command.
Note: You cannot use git from a terminal on your machine - use the terminal in Noteable!
The following github repository will be used to show how to upload repositories with git: https://github.com/robyngreene/tutorialsNoteable.git
Upload through the Git menu / left panel
Both the Git menu and Git from the left panel do the same thing, with the same interface.
- From the application menu, click Git, then Clone a Repository
- In the left panel, click on the git icon, then Clone a Repository
.... paste the URL of the repo - the https://... link, not the git@... link
This will clone the repository and any files it contains onto your Noteable account. Any changes you make to this file will not alter the original repository.
If the repository is "private", then after you click Clone you will be asked to provide a username and password.
Several templates and exemplars are available for use on the Noteable exemplar repository. You can access these by clicking Git and entering the following URL: https://github.com/edina/Exemplars2020.
Upload using git commands
If you would like to use git commands on Noteable, you can either:
- open up a terminal by using any of the methods for opening a Terminal explained above in the option The Terminal, or
- Execute a command in a notebook-document using the ! "magic"
If the repository is private, or you wish the clone a non-standard branch, we suggest you use the terminal
You can use git commands such as git clone <url> by using the link from gitlab or github as you would with the files on your machine.
Remember that "~"" in the path correlates with your home directory on Noteable, not your computer, you will only be able to access folders and files that are on Noteable and the file you are uploading will only be uploaded to Noteable.
Managing code through git
Noteable does not restrict Git in any way - so users are able to create branches, push updates, and/or rebase code as they need to. Management of git repositories is outside our control.
Whist the git extension is surprisingly good, for anything complicated - drop to the command line and do it by hand.
Menus in the Jupyterlab interface
The jupyterlab interface has a set of application menus, where items are usable or "grey'd out" depending on the context. The authoratitive reference for the jupyterlab interface should be Jupyter's own documentation on the jupyterlab interface. Here's a quick rundown on the menus, plus two extra.
File
This menu typically allows you to create, open, save, or export notebooks, as well as manage file operations like downloading or printing. (for more information, refer to the subsection labelled Saving your work in a notebook ). For more information on downloading a notebook, refer to the subsection labelled Downloading a notebook.
Edit
This menu is only applicable when editing documents. It contains options such as undo/redo, copy/paste, find/replace, and cell manipulation in notebook documents.
View
Offers options to control what is shown in the interface, such as switching various side panels, adjusting the layout, and managing the visibility of different elements within the jupyterlab interface. This is also where you find how to toggle syntax highlighting, line numbers (counting the number of lines of code), and code-folding.
Run
This menu is only applicable when working in notebook documents. It provides commands for running cells, sections, or the entire notebook. It may also allow you to restart and run all cells.
Kernel
This menu is mostly only applicable when working in notebook documents. This is where you can restart, interrupt or change the kernel for the notebook you are currently viewing.
Git
Manages version control, allowing you to sync, push, pull, or commit changes to a Git repository connected to the currently listed directory.
Noteable
The Noteable menu is specific to the Noteable service, and provides quick access to key resources, allowing you to return to the launch page, view a resources page for additional learning materials, and access the help and guides page for documentation and assistance with the platform.
Nbgrader
Nbgrader adds it's own menu to the JupyterLab interface.
Nbgrader in jupyterlab improves upon the Legacy Jupyter interface as it opens sup-panels in the main work area, rather than opening new tabs in the browser.
The Nbgrader menu offers tools for managing assignments in Jupyter notebooks, allowing instructors to create, distribute, and grade assignments. It streamlines the process of generating assignments and ensures efficient feedback and grading for students within the platform.
Note that the place for defining cell types, and any points for that cell, are managed through the Create assignment panel on the right-hand side. See the Developing assignments with the assignment toolbar documentation
Tabs
Manages multiple open tabs (launchers, terminals, documents, etc) within the main work area, allowing you to activate tabs or switch between them.
Settings
Access to various configuration options for the notebook environment, allowing you to customize preferences such as
Help
Provides access to help documentation, tutorials, or platform-specific support resources for Jupyterlab. When Context Help is enabled, it can show documentation specific to a class or method, and/or load reference documentation appropriate for the currently focused tab.
Can I use more than one kernel at the same time?
The notebook server allows multiple notebook documents to run concurrently. Each document can use a different kernel, provided that the kernel is available on the server.
However, a single notebook document cannot communicate with more than one kernel simultaneously. Each notebook document is limited to using only one kernel at a time.This means you can open several notebooks, each using a different kernel, but any single notebook can only use the kernel it was assigned.